Sitecore User Manager is a great management tool which is easy to use. If you are unfamiliar with the panel, it is so intuitive that there is no need for any training. Also, there exists official Sitecore documentation on how to edit and manage a user account.
Customization of User Manager
What if User Manager is being used for more than just managing Sitecore users, but also normal website users? Well, then it’s the same, but often basic functionalities are not enough for client. Many times I was asked if Sitecore allows to display additional information in User Manager. For example – is it possible to add custom profile data in new columns? When I explained that it’s not out of the box functionality and it will need to be customised, then often it ended in reply that it’s not that important and we can live with what we have. But should we leave it as it is? Of course not! Sitecore is known for its great customization options so it should be done when needed.
Where should I start
First let’s start with finding User Manager. Look for file under path \Website\sitecore\shell\Applications\Security\UserManager\UserManager.aspx. What now? Should we edit it? No, then we’ll lose original file. Luckily in core DB exists field which points to file which should be used for User Manager, so best option would be just creating custom aspx file and use it.
You have to create new UserManagerCustom.aspx file in your project under the same path as original file in Sitecore folder (sitecore\shell\Applications\Security\UserManager).
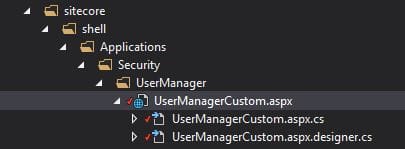
Essentially it will be just a copy of existing UserManager.aspx, but it will use your class in Inherits attribute:
<%@ Page Language="C#" AutoEventWireup="true" CodeBehind="UserManagerCustom.aspx.cs" Inherits="UserManagerCustom" %>
And your class will inherit UserManager class in code behind:
public partial class UserManagerCustom : Sitecore.Shell.Applications.Security.UserManager.UserManager
Next step is to set new path for UserManager item in core DB (/sitecore/layout/Layouts/Security/SecurityManager).
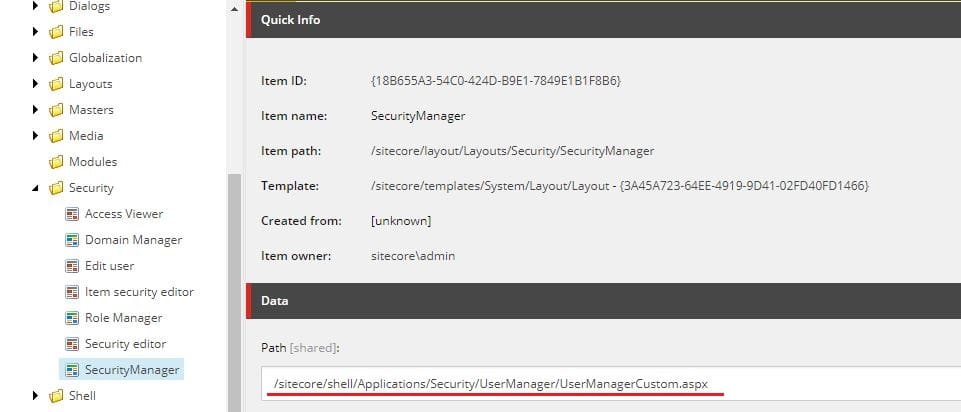
And that’s all you need to do in order to start customizing it!
Hide columns
Let’s start with something simple. If you look at the grid definition in UserManagerCustom.aspx, then you can see that there are also definitions for columns:
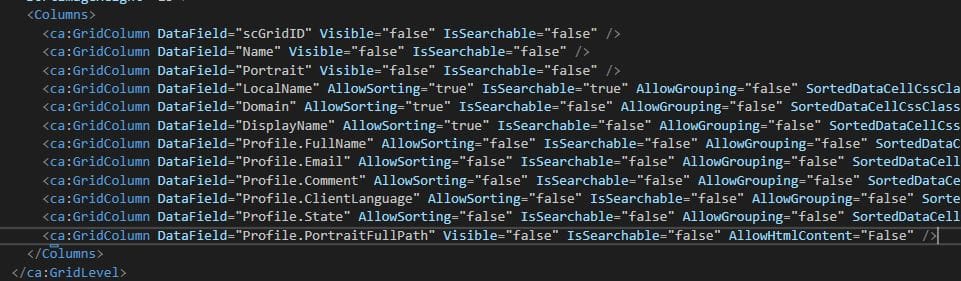
You can add attribute Visible="false" to desired column or just delete it completely by removing <ca:GridColumn ... /> line and that’s it.
Adding new columns
You could think that adding new column would be more or less the same.

Well yes…
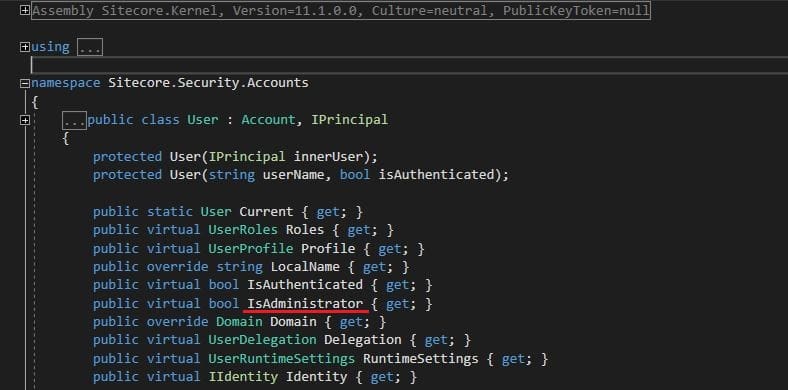
It will work in the same way, but only if you try to add already existing data from default Sitecore.Security.Accounts.User class. For example property IsAdministrator already exists, so let’s add column with info if user is admin or not.
Basically we need to add new GridColumn line with IsAdministrator property set in DataField attribute:
<ca:GridColumn DataField="IsAdministrator" AllowSorting="true" IsSearchable="false" AllowGrouping="false" SortedDataCellCssClass="SortedDataCell" HeadingText="IsAdministrator" AllowHtmlContent="False" />
As a result we’ll have new column with bool data:

…But actually no
Ok, now something more complicated – what if we want to add new column with field from our custom user profile? We’ll have to do a bit more work to achieve this.
By decompiling Sitecore.Client and looking into Sitecore.Shell.Applications.Security.UserManager you will find OnLoad method
protected override void OnLoad(EventArgs e)
{
	Assert.ArgumentNotNull((object) e, nameof (e));
	base.OnLoad(e);
	Assert.CanRunApplication("Security/User Manager");
	ComponentArtGridHandler<User>.Manage(this.Users, (IGridSource<User>) new GridSource<User>(Context.User.Delegation.GetManagedUsers()), this.RebindRequired);
	this.Users.LocalizeGrid();
	this.WriteLanguageAndBrowserCssClass();
}
with interesting line:
ComponentArtGridHandler<User>.Manage(this.Users, (IGridSource<User>) new GridSource<User>(Context.User.Delegation.GetManagedUsers()), this.RebindRequired);
You can see that there is GetManagedUsers method which gets a list of users for grid. This means that we could use our own method to get customized list of users. Let’s create CustomUser class, which will inherit Sitecore.Security.Accounts.User. CustomUser will be only used to display data, so it won’t need anything besides new properties to fill additional columns.
public class CustomUser : User
{
	public CustomUser(User user) : base(user) { }

	// add as many properties as you want
	public string NewCustomColumn
	{
		get
		{
			// write your code here to get what you want, e.g. get some custom property from profile
			return this.Profile.GetCustomProperty("MyCustomProfileProperty");
		}
	}
}
Now it’s just a matter of getting list of our CustomUser and using it in grid. It can be easily done by using GetManagedUsers method with Select query:
var usersList = Sitecore.Context.User.Delegation.GetManagedUsers().Select(x => new CustomUser(x));
ComponentArtGridHandler<CustomUser>.Manage(this.Users, (IGridSource<CustomUser>)new GridSource<CustomUser>(usersList), this.RebindRequired);
In code behind we will have to override OnLoad method and include all required private methods which are used. It will look like this:
public partial class UserManagerCustom : UserManager
{
	protected override void OnLoad(EventArgs e)
	{
		Assert.ArgumentNotNull((object)e, nameof(e));
		base.OnLoad(e);
		Assert.CanRunApplication("Security/User Manager");
		var usersList = Sitecore.Context.User.Delegation.GetManagedUsers().Select(x => new CustomUser(x));
		ComponentArtGridHandler<CustomUser>.Manage(this.Users, (IGridSource<CustomUser>)new GridSource<CustomUser>(usersList), this.RebindRequired);
		this.Users.LocalizeGrid();
		this.WriteLanguageAndBrowserCssClass();
	}

	private void WriteLanguageAndBrowserCssClass()
	{
		this.Form.Attributes["class"] = string.Format("{0} {1}", (object)UIUtil.GetBrowserClassString(), (object)UIUtil.GetLanguageCssClassString());
	}

	private bool RebindRequired
	{
		get
		{
			return !this.Page.IsPostBack && this.Request.QueryString["Cart_Users_Callback"] != "yes" || this.Page.Request.Params["requireRebind"] == "true";
		}
	}
}
And as last step we need to modify grid by adding new GridColumn:
<ca:GridColumn DataField="NewCustomColumn" AllowSorting="true" IsSearchable="false" AllowGrouping="false" SortedDataCellCssClass="SortedDataCell" HeadingText="New Custom Column" AllowHtmlContent="False" />
Congratulations, now you have your custom column displayed in User Manager!
Looking for custom software development? Contact us now!
Sorting data in columns
Another easy change. You wish you had option to sort columns? With this one simple trick you will be able to! Just set AllowSorting to true. It works for custom columns and most of the default ones. For example it won’t work Full name or Email, but there is easy fix for that – in CustomUser class add new property, which will return existing one. Weird, I know, but it works. Let’s add new CustomEmail property:
public string CustomEmail
{
	get
	{
		return this.Profile.Email;
	}
}
and change Profile.Email column to your CustomEmail:
<ca:GridColumn DataField="CustomEmail" AllowSorting="true" IsSearchable="false" AllowGrouping="false" SortedDataCellCssClass="SortedDataCell" HeadingText="Email" AllowHtmlContent="False" />
Now we have sortable Email column!
Conclusion
Although extending User Manager and customizing columns can be seen as something which requires a lot of work and is not easy, in reality with this post you should be able to customize it in whatever way you want without worries! You could add column with info if account has specific Role, date of last activity on account or whatever you think of, so just go ahead and try it!
Would you like to talk with our experts about technology solutions for your business?