In 2021, the developers of the Stockfish chess engine took ChessBase to court. The reason? ChessBase had violated a GNU General Public License (GPL). They used Stockfish’s open-source code in their own product while marketing it as their own, all in violation of the agreement. After years of alleged non-compliance, the Stockfish team sued ChessBase. This led to a high-profile settlement. The result of the case forced ChessBase to remove their offer from the market.
The problem is most applications use some type of external library or code. It’s not that developers are lazy, but we don’t need to reinvent the wheel for every new application. Using open source gives us access to direct solutions to our problems. This leads to an important part of application development: checking installed dependencies’ licenses.
If we don’t do this, we might face a similar situation to ChessBase and face serious legal consequences. This could happen because one of the libraries may have been developed with a restrictive or incompatible license.
How a single package can force you to open-source your code
Imagine a situation where you install a useful package into your application. You’re working for a big company that has just developed a new solution, and everything is ready to go live. But here’s the problem, the library you used is licensed under the GNU General Public License (GPL).
This type of license, while not inherently bad, comes with obligations that might not align with your project’s goals. For example, the GPL requires that any software created from GPL-licensed code, including your own software if it’s considered a derivative work, be made open-source and publicly available. This means your employer could be legally obligated to share the source code of significant parts of your application. This might expose trade secrets or intellectual property.
Why manual checks might save you, but at a cost
Manually reviewing all the packages in your application might sound like a good way to avoid issues. But here’s the catch, applications often rely on hundreds of external libraries. Each of these libraries can pull in additional dependencies without you even realizing it. The number makes manual checks time-consuming and error-prone. It’s easy to miss a package or misinterpret a license.
Plus, even if you manage to complete the review, you’ll need to document your findings in a way that can be referenced later. While manual checks could theoretically save you from trouble, in most cases, they’re impractical. This is especially true for large projects. Could automatic checks be the answer we are looking for?
How do you run an automatic license check?
As is always the case in software, someone has already faced this problem and solved it. There are plenty of tools that check licenses and generate detailed reports. These tools reduce the risk of missing problematic licenses and make it easy to document your findings.
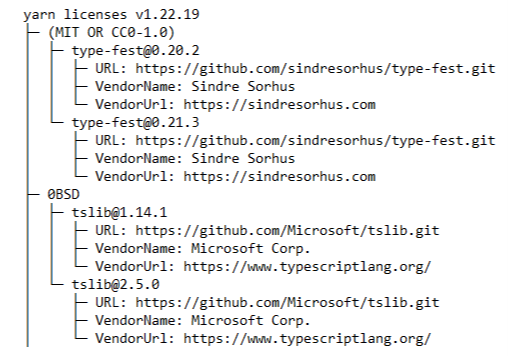
In the Node.js ecosystem, popular dependency managers like npm and Yarn offer solutions to help streamline the process. For instance, Yarn includes the yarn licenses list command. This generates an easy-to-read report of all your dependencies and their licenses.

If you’re using the npm package manager, there’s no built-in command for license checks. Instead, you’ll need to rely on third-party tools. Here are three of the most popular options:
How to use the license-checker tool for audits
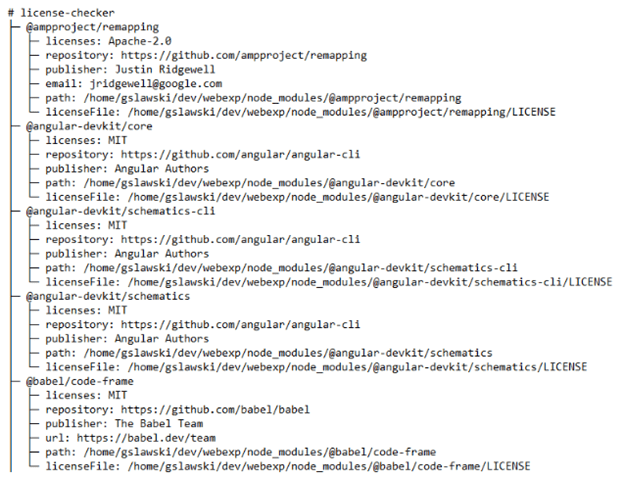
One of the most effective tools for auditing licenses is license-checker. It generates clear, easy-to-read reports of your project’s dependencies and their licenses. To get started, install it globally with npm:
bash
npm install -g license-checker
Once installed, navigate to your project directory and run:
bash
license-checker
This will generate a detailed report similar to the output of Yarn’s license-checking tools.
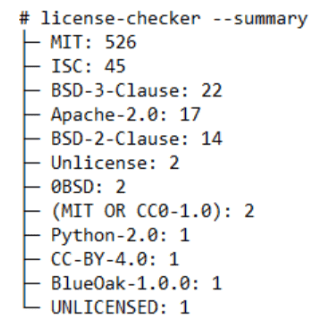
The license-checker tool can also create a summary of your project’s dependencies, grouping them by license type. This is helpful for quickly understanding your application’s licenses. To generate the summary, simply run the following:

bash
license-checker --summary
What is a BOM file and why do you need one?
Once you generate a license report, it’s crucial to save it for future reference and share it with your team or employer. A good way to do this is by creating a Bill of Materials (BOM) file, which documents all external package licenses. Generating one is simple: just stream the output of your tool (like license-checker) into a file:
bash
license-checker > BOM.txt
For even better security, consider integrating this step into your CI pipeline to flag unapproved licenses. Additionally, tools like SBOM generators can align with industry standards, such as SPDX, to enhance compliance efforts
Why auditing licenses is non-negotiable
As developers, it’s easy to overlook license audits, especially when juggling tight deadlines. But skipping this step can seriously backfire, not just for you, but for your entire company. While automated tools are essential, they may still require human oversight, especially for interpreting edge cases like dual-licensed dependencies or custom license text.
Take the time to run a license audit on your dependencies, share the results with your team or employer (a BOM file works great for this), and consider automating the process in your CI pipeline. It’s a small effort that can save you a ton of headaches down the line. Don’t let a single overlooked license become the reason your hard work ends up in legal trouble.


